Accidentals are highly overrated... The Gravikord is really more about lyricism, polyrhythms, and modal playing, than about chromaticism. But that being stated, there are several ways to play chromatically on the Gravikord. On slower pieces, accidentals can be created by sharping individual notes. Do this by pushing and tensioning the section of the string behind the bridge with one finger while playing the string normally. This can be done using two hands or with just one hand. It takes some practice. I do this on some slow classical pieces (e.g. the "Adagio Cantabile" from Beethoven's Pathetique', Jay Unger's “Ashokan Farewell”). This is similar to a technique used in Japanese koto playing. I also have recorded an original fast fully chromatic piece called "Accidental Etude" on our recording “Cherries & Stars” where I use a guitar effect called a "pitch shifter" and a momentary contact switch. The effect is set to one-half step; with effect on full, no source, so that every time the switch is held down, the entire instrument's tuning shifts up a half step, or if you prefer down a half step. Since moving all the white notes on a piano one half step covers all the black notes, you have full access this way to all 12 tones. Since the instrument itself produces no amplified acoustic sound, there is nothing to complicate the pitch altered sound of the electronic effect. It's like all of a sudden having 24 extra strings to choose from! You can easily play a fully chromatic scale using this method. I did it as a challenge to myself, and people have commented how much they like the piece, but I really hardly ever play that way. It'd be interesting to see how far this technique could be taken. With the right pitch shifter parameter, called "pitch bending," there is also an easy way of getting continuous pitch control over adjustable length intervals that can make the Gravikord sound like playing rock guitar with a whammy bar or even like playing a slide Hawaiian guitar or Dobro. Daniel Berkman is using one of these on his YouTube video "A Piece of Heaven." This opens up the Gravikord to lots of microtonal and chromatic possibilities without making its playing overly complicated. There are lots of other guitar effects and pedals that you can try which will work well with the Gravikord. If you have a friend with guitar multi-pedals try them out and see what you like before buying. It all depends how adventurous you are. Distortion, Delays, Delay Loops, Wah-Wah pedals, etc, etc!
PLAYING WITH CROSS RHYTHMS
What are cross rhythms? Cross rhythms exist when two different simple rhythms interact simultaneously often producing a complex and usually unanticipated new rhythm. Very few instruments are capable of easily producing cross rhythms. The classical composer J. S. Bach wrote cross rhythms for keyboards when the right and left hands cross over each other, but watch out when they are playing in the same range as it's hard to keep your fingers from getting tangled up. Due to its double structure this problem never arises on the Gravikord. Cross rhythm playing is one of the great pleasures and powers of the instrument that can be directly traced to its African roots! Using an alternate plucking technique, play a simple rhythm in the treble with your right hand and the same or a different syncopated rhythm in the bass with your left hand. Then keeping your playing patterns constant slowly move the treble hand to the bass while simultaneously moving the bass hand to the treble. As they approach each other and cross over, you will start hearing different unexpected cross rhythms. The forms these cross rhythms take are hard to anticipate. Also the same cross rhythm pattern can sound very different depending on where you place the down beat accent. Cross rhythms happen naturally on the Gravikord, when you find one you like, keep it going or you will quickly lose it! Then slow it down and try to figure out just how you're creating it. When you are sure you've got it down, try moving it around freely over the Gravikord strings, keeping your finger spacing and the plucking patterns constant. Then try exchanging what the right and left hands are doing. This last part may not be so easy, but when you become fluent you will have full use of this new cross rhythm! Cross rhythms can be very rich and subtle, and only with experience and practice will you be able to master them. There are a great number of possible cross rhythms you can create as they come from the various combinations of many possible simple rhythms. Becoming comfortable with cross rhythms will open new musical vistas for most musicians and can become a deep source of inspiration!
BALANCED PLAYING EXERCISES
To help break out of a dominant hand situation and free up your rhythmic repretoire I suggest dropping all melodic content in your music for a while. Just focus on capturing different rhythms and moving them around on the strings. Your own exercises you develop are probably the best, but also listen to how it sounds when keeping one hand (thumb and forefinger) in the bass register, and the other only in the treble. Then switching back and forth in a rhythmic pattern. Just listen and don't try to direct your playing too much. Also try having one hand "span" the other, and switching...that is one hand very large span - thumb in deep bass and forefinger in high treble, other hand very close together in the mid range. While doing the above things change your plucking pattern using simultaneous and alternating plucking patterns - including mixed techniques one hand alternate, one hand simultaneous plucking - and also change which finger is playing the down beat. Picking across a strum is also fun! Don't do all of this stuff together in a mishmash but concentrate on each one for a while and get comfortable there, later you can mix and match. Don't worry the melodies will come on their own and then you will have a big interesting rhythmic vocabulary to play with them. These exercises should help you break loose and become a more balanced player. The goal is to not favor either hand in your playing.
READING MUSIC NOTATION
Surprisingly the reading of music notation and the transposing of other written keys for playing on the Gravikord is also greatly simplified. It can all be done quite quickly and simply in your head by using an easy mental trick. Because of the unique structure and tuning of the Gravikord, all the notes on one side of the bridge are in the staff spaces and all the notes on the other side are on the staff lines! So, no matter what key the music is written in just determine where the root note “Do” is on the staff. Now here's the trick, mentally let that be the position of your root note “G” for example. If it’s on a staff line, let that line represent the “G” string on the Gravikord and all the strings on that side of the bridge will correspond spatially and sequentially to the other lines on the staff, all the notes on the other side of the bridge will correspond spatially and sequentially to the staff spaces. If the root lies in a space then the opposite is true. Now without actually transposing the key and rewriting the individual notes, the staff itself accurately represents spatially the strings and the notes of the Gravikord and you can easily find your way around the music as if it were written in a tablature specially designed for the Gravikord! The position of the notes on the staff tell you which string to pluck on the Gravikord and all you have to think about are the note values to get the rhythm and feel of the music. Pretty neat stuff!
PLAYING IN DIFFERENT SCALES
The Gravikord is also very easy to play in various non-traditional and non-western scales. Just put in the notes of the scale you wish to explore and take out the notes you don't need. Then there is no need to learn what notes to avoid as in playing music in other scales on the piano or guitar. You can very quickly get into the feeling and spirit of the culture the scale came from or develop your own unique tunings. Also for those interested in playing in and exploring just intonation the Gravikord is an easy instrument to adapt to this purist's pursuit. These can be a great and broadening musical experiences!
THE SOCK TRICK & THE PIZZICATO MUTE
For several years I used to place a rolled up cotton sock just in front of the bridge between the string ranks to achieve a great pizzicato sound. It was a little hit or miss as far as muting every string. A more elegant solution is our new "Gravikord Pizzicato Mute" (see our parts page). This mute is placed just in front of the bridge, wedged between the string ranks. Its felt edge mutes all the strings resulting in the Gravikord producing a strong muted pizzicato sound somewhat similar to a wooden marimba. To really sound like a marimba jack up the treble and the overall volume and try using a medium short delay with a medium feedback or decay. This will emulate playing a wooden marimba calypso style with multiple mallets. If you wish to order one of these you'll have to cut out a cardboard template of the space between the strings just in front of your bridge. Use a thin flat cardboard like shirt cardboard - not corrugated box cardboard. We've made variations in the Gravikord bridge over the years and this is the only way to insure an accurate fit. Be sure the template actually touches all the strings, then mark the positions of the top and bottom strings on both sides. Send in this template with your order.
PLAYING CHIME NOTES ON THE GRAVIKORD
Hitting chiming notes (first harmonic overtones) on the Gravikord can be easily done, but it requires some preliminary setup. On the guitar chiming notes are easy because the strings are all the same length and the first harmonic nodes all line up exactly on the octave fret. On the Gravikord the strings are different lengths so you'll have to find the octave node for each string, it is exactly half way from the bridge to the neck of each string. You can find it easily by using one finger to deaden the string about half way then move it slightly up or down the string until plucking it sounds a bright chime note. Mark the string at the node with a black magic marker. Find the other nodes on the other strings you might want to chime and mark them the same way. Now you know right where the individual nodes are on each string and can easily dampen the node and get the chiming notes while playing.
PLAYING THE "HIGH ART" SIDE OF THE BRIDGE
The string section between the bridge and the tuning machines normally is not meant to be played. But there is nothing to stop you and they will produce just as strong and clear notes as the other side of the bridge. The problem is that these notes are not tuned and are simply what is left over after tuning the business end of the instrument. However they can be used for special "arty" effects. Your imagination is the limit. If you get interested in this side of the bridge the tuning of the notes can actually be influenced by tightly wrapping some short sections of pipe cleaner around each string. As you slide this off balancing weight up or down the string its frequency will be affected without effecting the tuning of the normally played side of the string.
TONE BAR
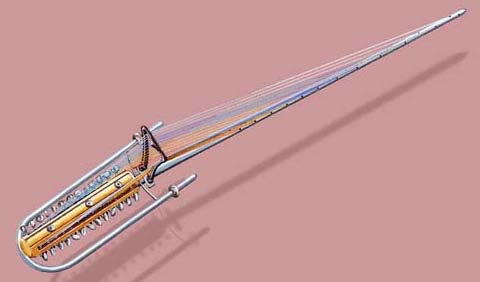
The tone bar is attached with the tape and plastic connectors as show in fig. 4. The spring rods should go to the inside surfaces of the “U” tube handles. Attach the tone bar with the four plastic tie connectors, the two end connectors pass through the eyes in the spring rod ends. Position so that tone bar is resting firmly on bridge when the connectors on the same side are several inches apart, thus, tensioning the tone bar to the bridge. Some bending of these spring rods may be necessary to get the right position and tension. Then fix the tone bar in its position by taping the springs to the handles just above the end fasteners with the tape provided (fig. 4). The tone of the instrument can now be adjusted by moving the position of the two moveable plastic connectors. changing the tension of the tone bar. The tone bar can also be used as a mechanical bass/treble balance control. Tightening the bar will preferentially dampen the bass response of the bridge and as a result bring out the treble. Experiment, sometimes to balance the sound, the side of the bridge with the transducer may need to be tensioned more than the other. The bridge may also be dampened without a tone bar by pulling it against the players' chest. The tone bar will tend to limit some of the sympathetic vibrations of the un-played strings, resulting in a purer and simpler, less chorus-like sound of the instrument.
OPTIONAL TONE BAR LIFTERS & DYNAMIC CRESCENDOS
While most people prefer the less complex sound of the Gravikord with the tone bar applied, the sound of the instrument with the tone bar removed can be desirable in some slower more lyrical pieces. The tone bar lifters are designed for this purpose. Remove tension from the tone bar by sliding the moveable plastic ties on the spring rods all the way back. Then the tone bar lifters are manually positioned under the spring rods of the tone bar so that they just lift the bar off the bridge. This is done before playing an appropriate piece. Then the full sympathetic sound of the instrument is now produced, similar to playing the piano with the sustain pedal engaged all the time, only more so. During playing the bridge can be partially dampened by pulling the instrument to the player’s chest,
momentarily depressing the bar onto the bridge. With the lifters engaged the instrument also has stronger sound and larger dynamic range. Beautiful long crescendos can be created by pressing the tone bar firmly to the bridge with the player's chest while plucking very lightly, then slowly releasing the pressure on the tone bar while increasing the force of plucking the strings until the bar is lifted off the bridge and you are plucking the strings very strongly. This has a strikingly pleasing effect because the sound of the instrument simultaneously goes from the quiet simplicity of the dampened state to the full harmonic complexity of the un-dampened sympathetic state. So it becomes a crescendo not only of volume but also of harmonics. For decrescendos do the opposite.
AN EASY TREMOLO
An easy tremolo can be achieved by grasping the handles firmly and giving a strong rapid shake to the whole instrument. This can be used effectively on slow pieces and for dramatic phrase endings.
LADIES FASHION NAILS & FINGER PICKS
Ladies fashion nails are very good as finger picks, and have a very natural feel when glued on. Your natural nails are of course the best, but glue on plastic nails are a great help through a broken nail. Some cheap brands are too thin, so sometimes it's best to put them on upside down because they tend to be thicker and stronger at the base. Roughly trim with a scissors before attaching, sand the underside to make them stick better, then glue on and fine tune. Don't buy the kind with double stick tape, they won't stay attached while playing. Also you can pick up some nail polish that is the same color as your own nails and paint them out so they are more natural looking. If you have a problem with your nails breaking there are finger nail reinforcement kits with glue on individual fiber inserts that are helpful. Guitar finger picks do not work very well as they seem to be designed for picking in only one direction and tend to catch on the strings in the other. I once used finger picks made for sitar players that worked better than guitar picks but they are hard to find. They were made of wire and formed a kind of vertical "vee" over your finger tips so that you could pluck and strum in both directions easily. They seemed to come in only small sizes. If you find some large ones send four to me please.
STRINGS & NAILS TO GO
When playing out for pay, you must have a small emergency supply kit with you that should contain at a minimum the following - some extra uncut yellow and orange strings, a few extra eyelets and beads for the string ends, a small curved surgical clamp or a tweezers, a small sharp scissors, a selection of glue on fingernails and glue, a fingernail board or fine sandpaper square. These items should be kept together in an easily accessible pouch. You should also have a chromatic tuner with an extra battery, and an extra instrument to amp cord.
JUDGING YOUR STRINGS
Strings on the Gravikord will sound good and last a very long time. Often if they break, they will break at the neck end and the same string can be retied and still have a long life. If the same strings have been in service for a long time it's a good idea to check them out several days before an important gig. Fading color and signs of wear at the point of plucking are things to look for. If there is noticeble wear, the string can still sound good but be nearing the end of its life. To evaluate it without reducing its tension, observe it under a strong light. Hold the string firmly between your thumb and forefinger above the plucking area and twist it. If it twists as a whole through the area of wear it is still good. But if the twisting stops at the area of wear and tends to bunch up there, cut the string off and replace it.
TRAVELING WITH THE GRAVIKORD
You'll find the Gravikord is a much easier traveling companion than any other member of the harp family. You won’t have to crate it or buy an extra seat ticket for it. You should already have a Gravikord case. Here are some tips from experience. At airports do all you can to include it in your carry-on luggage, including not showing it at check-in. Board first with the special boarding people, that way you can secure an empty overhead luggage compartment, it will fit easily in most. Supervise as others load in so they don’t jam the compartment too full. Also if this doesn’t work out, try to have it put in the back of the first class hanging coat closet. Plead special consideration for musical instruments! If you run into some “hard nosed” opposition and they insist on baggage checking, you insist on “Special Handling.” Loosen the strings and set it up in the “bridge down position” the way it was shipped to you. Tying or taping the bridge to the platform and neck, and using bubble wrap or other padding around the bridge area will greatly increase the probability of a successful outcome. It’s a good idea to prepare it this way in advance. If you saved its shipping box there is also the option of shipping it ahead separately via UPS or USPS.
THE SOUND OF THE GRAVIKORD
The sound of the Gravikord, as with all electric instruments is protean. The instrument sounds good over good sound systems, the better the system the better it sounds. Right now I'm using a Yamaha Stage Pass for small venues. I get a very good warm live sound out of it, I also use a delay in the system which even when off adds somewhat of a pre-amp boost to the signal. Make of amplifier, kind of speakers, use of pre-amps, use of sound modification pedals, especially ones made for acoustic guitar sound enhancement, can all dramatically affect the final sound. Experiment with different combinations until you are satisfied that you know the range and what you like.
THE ACOUSTIC PRACTICE BELL
With our new "Acoustic Practice Bell" attached to the neck of your instrument you'll be able to listen to the acoustic sound of the gravikord or gravi-kora without using any electronic amplification. Although the volume produced is not nearly loud enough to perform publicly in concert, it does have a soft pleasant clear quality of sound that is well suited for your own private practice sessions. The bell is spun aluminum and it acts like a speaker mechanically amplifying the sound of the strings, similar to what the active element in a dobro does but without any added resonance chamber. It can be easily attached or removed from the neck of your instrument whenever you wish. With this option you'll no longer need to plug in to practice.
RECORDING THE GRAVIKORD
It often seems that when recording direct in, a lot of the warmth and richness of the instrument can be easily lost. I'm always trying to get out a recorded sound that sounds as good as playing live, but it isn't easy for some reason. Here's some things I do...Try playing through a good sound system and record that by miking it with a good mike. Also several years ago I bought a neat rack component that I use to record direct in. It's called a "Vitalizer - psychoacoustic equalizer" made by Sound Performance Laboratory. I don't know if this is still available but talk to someone at a good sound recording equipment store. If it's not available anymore there's always something new coming out. You're basically trying to restore the lost harmonic subtleties that tend to get eaten up by the recording process. Also always use some compression when first laying down a track.
PORTABLE VOLUME / TONE CONTROL
For real time electronic control of volume and tone in a live performance, purchase a belt-clip type pre-amp (e.g. Fishman Model G, Acoustic Pre-Amp). Replace the long instrument cord with a short patch cord. This gives you easy access to the tone control and volume input of the PA system you are using without actually having to go over to the amp and change the settings there. This can also be fed directly into a wireless system that is in your back pocket giving you complete freedom to perform in any way you wish. Please try to maintain a degree of good taste for my sake - thanks...
PLAYING YOUR GRAVIKORD STANDING UP
The Signature Series Gravikord is now provided with an eye fixture on top of the tuning block for the attachment of a neck strap. Visit a good music store and purchase a neck strap made for the bassoon. The best ones have a simple hook, are length adjustable and have a wide comfortable neck pad.
CARE AND FEEDING OF THE GRAVIKORD
The instrument is made of welded maintenance free stainless steel; it is not plated. If scratched or nicked it can be filed, sanded and brushed or polished to its original finish. Those green Scotch Brite pads are great. The metal frame should last a lifetime. When not being played, it should be returned to its case, set in optional stand (fig. 5), or hung upside down and vertically on a nail in a wall by the exit hole at the base of the neck. If desired, the frame can be repolished with a metal polish suitable for stainless steel.
The tuning machines are nickel plated steel and should be periodically sprayed with a light oil (WD-40), or wiped with a light oil-soaked rag (3 in l Oil). If you use a tone bar, the spring rods should also be wiped at this time since they are high carbon spring steel and not stainless or the finish may deteriorate. If it does, lightly sand them with very fine sandpaper and oil or wax.
As with all electric instruments, the first failure to suspect is a deterioration in the instrument to amplifier cord. If a short or weak connection develops, replace the cord. Most music or electronics stores carry cords that can be used as replacements. After many repeated tunings, the bridge may develop a lean towards the tuning block. It usually can be straightened by using both hands on the upper portion of both sides of the bridge simultaneously. Should anything disastrous happen to the bridge and transducer, save the pieces and return to White Bear Enterprises to purchase a replacement.
ENJOY YOUR GRAVIKORD!
You'll find the Gravikord has a magical, mysterious quality all its own. It is at once simple and complex. Because its structure is not like most western instruments, some simple techniques can often lead to intricate results. Often times the left hand does not know what the right hand is doing – but the ears don’t care and integrate it all into an unexpected musical whole. It’s like holding on and letting go at the same time. The more you play the deeper and more natural will become your understanding of this. Listen to the Gravikord — it will lead you on. With it more than with any other instrument, you can be your own teacher. Enjoy the mystery, enjoy the mastery!